How to create a Quick Campaign
Overview
The Quick Campaign feature allows you to send a simple SMS to your contacts, without the need to create a bot first. This is very useful when you're in a hurry and don't need your contact to interact with an automated conversation.
How to create a quick campaign
To create a Quick Campaign, you'll first need a Campaign File.
You need to include your contacts' phone numbers in a column called Phone (Field Name). You can organize custom values uploaded against the contact into additional columns. When composing your quick campaign message, simply include the Field Name between two # # to retrieve the custom value stored against a specific contact. (e.g. #Name#)
When your campaign file is ready, go to the Campaigns screen and select Quick Campaign.
You'll land on the Quick Campaign setup window.
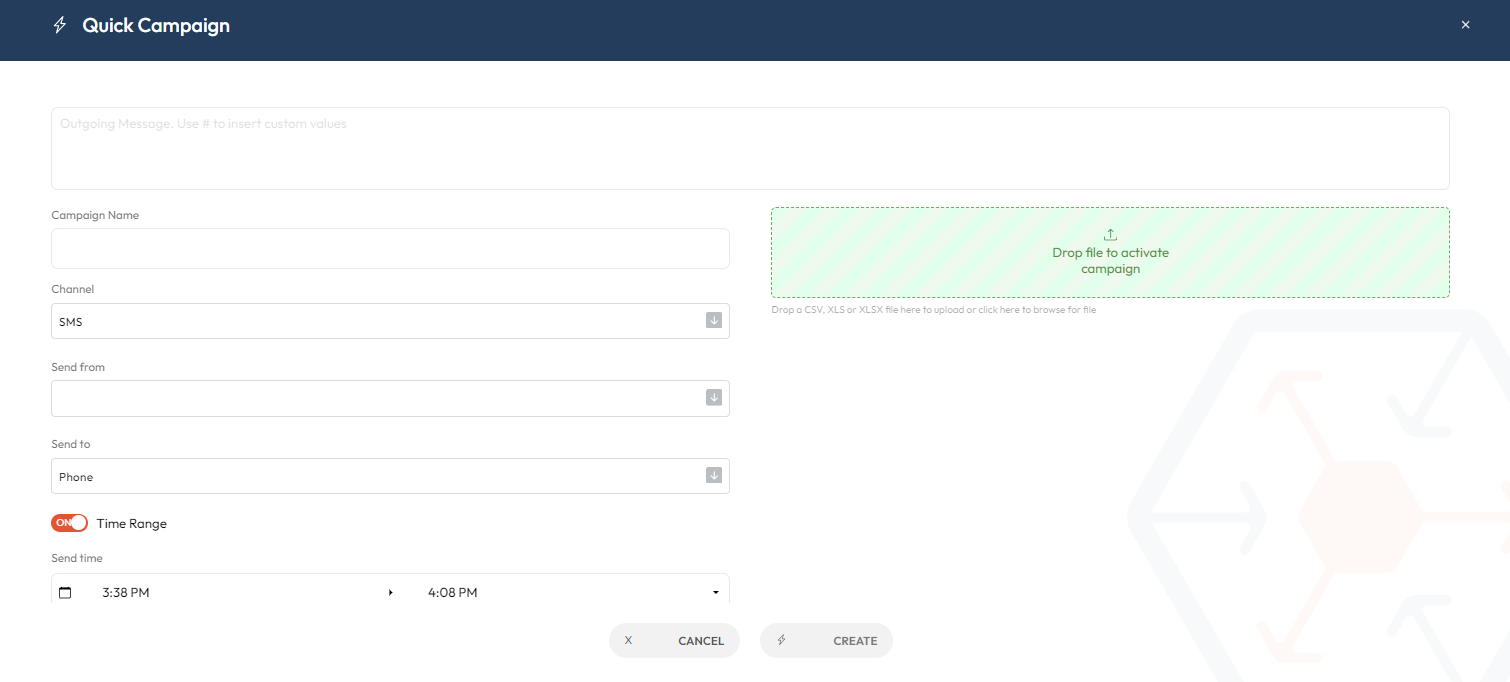
There are a few things you'll need to fill out and define here:
- Outgoing Message: This is the message that will be sent to the recipients. You can insert Custom Values into your message by inserting the name of the field name between two #s. (e.g. #Name#) These will then be replaced with the contact details indicated in the file that you upload later. Keep in mind that the field names used in the message must exactly match the ones you have on your file.
- Campaign Name: Here, you can give your campaign a unique name.
- Sent From: This is the SMS channel ID you'll be sending the message from.
- Send Time: Finally, you can choose if you'd like to send the message to your recipients right away (Send At Once) or within a time period of your choice (Send Between). If you select Send Between, you'll then be able to define the exact time period within which your message will be sent.
From here, the last step is to drop in the file containing the phone numbers of the desired recipients.
You're now ready to press Create!
Your Quick Campaign will appear on your the campaign screen. From here you can check its schedule and progress.


From the Conversations screen, you can use the advanced search filters to retrieve your conversations.
Related Articles
Outbound Campaigns
Overview Please note that, the documentation below describes the process of creating Campaigns on our new Web App. If you are looking for old UI documentation please follow this link. Webio's Campaigns screen simplifies the way you manage your bots' ...How to create an Inbound Campaign
Overview Set up a chat widget on your website or provide customers with a direct communication channel via SMS, WhatsApp, Messenger, or Viber. With Inbound Campaigns, your bots can engage visitors, answer questions, and seamlessly guide them through ...Automatic Rate Per Minute (RPM)
Quick Trick: Switch on Auto RPM for your campaign. Your campaign rate will then be set automatically at a rate that will spread your send across the available time window. For Daily Campaign - You can now use our Automatic Rate Per Minute to ...Webio FAQ
General Why can't I log to my Webio account? If you can't log to your Webio Account, try first to clear your internet browser cache and cookies or to log in from incognito window or a different internet browser (Make sure you are entering your ...Self-Service Studio - Generate Campaign File
Overview The Generate Campaign screen l lets you segment your whole customers dataset and generate a customer targeted campaign file based on the range of values you specify in this panel's fields. Your campaign file will include: Customers' IDs ...