Outbound Campaigns
Overview
 Please note that, the documentation below describes the process of creating Campaigns on our new Web App. If you are looking for old UI documentation please follow this link.
Webio's Campaigns screen simplifies the way you manage your bots' schedules. It allows you to send bots to your contacts allowing you to configure inbound or outbound campaigns.
Outbound campaigns can be set to go as:
- Once Off campaign - you can only use this campaign once - It will require an unique Campaign File.
- Daily Campaign - you can import the structure of your Campaign File and use it as a template to schedule and launch subsequent campaigns.
After you create a new campaign, you can find it using the search function at the top of the screen. The drop-down menu allows you to check each campaign details:
If the campaigns has schedules for that day, you will see:
- Campaign information:
- Any time between - For Daily Campaign, the campaign will only be triggered if the daily upload of the campaign file is made during this time window. The Import time selection is made during the campaign configuration process.
- Days File Expected - The file must be uploaded during the time listed in "Any time between" field and the days listed there. The selection of days is made during the campaign configuration process.
- The Drop file Window - Simply drop or upload your unique campaign file to have the campaign running.
- Also you will see
- The Bots Schedules details, such as the the days and times that the bot is sent and the name of the expected file.
A campaign can have multiple schedules and multiple bots can be managed by the same campaign.
If there are no bots scheduled for that day you will see the message "No schedules belong to this campaign" (first image below). Otherwise you will see the name, day (campaign was first created) and time of the schedule(s) ready to start (or those that are already processing).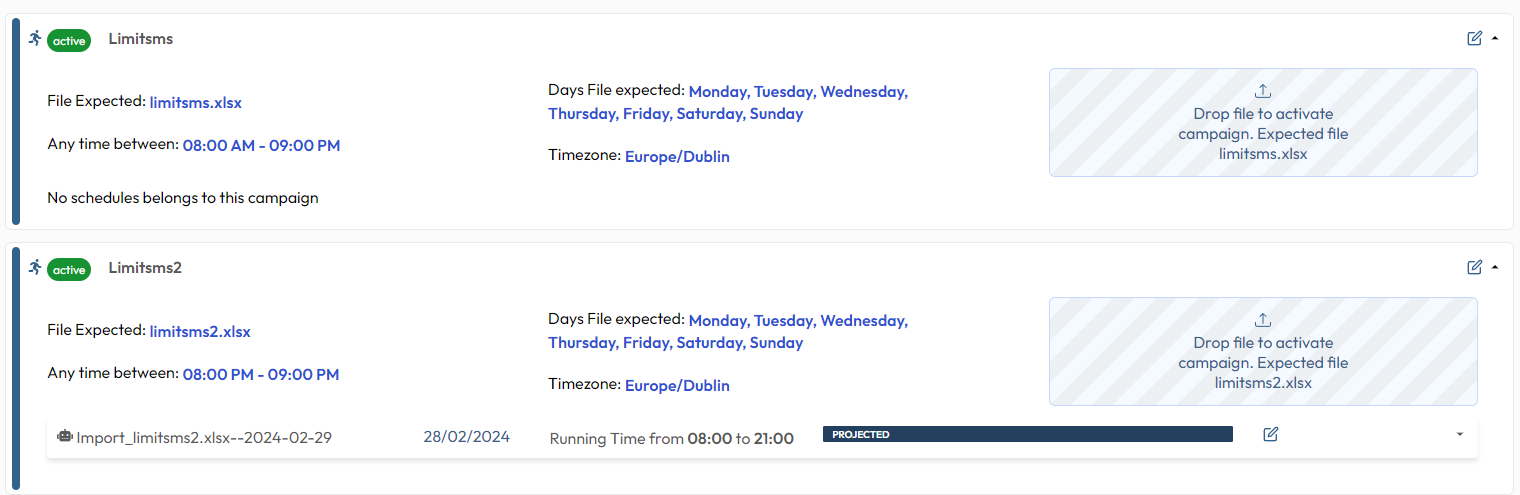

Quick Tutorial - How to configure a Daily Outbound Campaign
Please enable CC/Subtitles - Click here for fullscreen.

Before starting, decide what your Campaign file will be called (Every campaigns name needs to be unique and have an unique Campaign File) ready, also before creating a campaign ensure you have a Bot available to be sent in Outbound or Inbound campaigns.

If you are looking for Quick Campaigns documentation, please follow this link.
Set up a new outbound Campaign
On the Campaigns Screen, click CREATE NEW
Campaign general configuration
Give your campaign a unique name, then fill in the remaining fields.
If this will be a reoccurring campaign (Daily), remember to set Active and End dates as needed.
- Set the campaign Validity Period.
- If it is active on your organization, select a Propensities model.
- Take your Campaign sample file and drag it into the drop box on the top right corner. Or simply click on the drop box and make the upload.
Campaign File - example
- Accepted file formats are CSV, XLS or XLSX.
- The name of the file must be unique. For the Daily Campaigns, every time you drop the file to activate the campaign, the file needs to be named and formatted the same as the first time you created the Campaign.
- When you just update the values in your file but don't change any field names (Headers) you can keep simply dropping the same file to activate the campaign. When, instead, you add additional field names (Columns) to your file, you will have to re-map the campaign. (Make sure to update your Bot Version if it is needed, simply re-select the same bot).
- For phone numbers including WhatsApp, Viber Numbers include the national code without the + (E.g. 447846587486)
- Make sure there are no empty spaces in the field.
- You have to store at least your customers channel IDs in one column (E.g. Phone number). That column header has to match the Sent To field in your Bot configuration.
- Other customer data are optional. You can enrich the conversation flow when they are present. The names of the remaining headers have to match the field names your Bot is using.
- You can alter a field name in the target column during the campaign field mapping process.
- Choose if this is a Daily of Once-Off.
- For a Once-Off Campaign the contacts in the file you will import will receive the Bot, for a daily campaign they won't.
- For Daily the file you upload, is the template according to which your future uploads must be structured and named. When you select Daily, you will need to set the days and times at which you want to be able to import data then drop the file into the Campaign Drop Box to activate it.
- If needed, set automate RPM.
When you're happy click NEXT.
Calculated Fields
After the campaign general configuration, you will land on the Calculated fields screen.
Leave the fields empty and click NEXT.
Fields Mapping
The column headers (Field Names) of the campaign file will be extracted on the field mapping screen. Select the Type of data that the field contains.
You must specify the field that contains the phone number or ID to which you want to send the bot and associate it with the correct channel. For example, if you're sending text messages, you'll need to set up the field that contains mobile numbers on your Phone.
The field that you tag as Customer ID will appear in your data export and also in the Conversations screen on the conversation header.
If you need to alter the field names to match the ones your Bot is using, you can do so under the Target column, this is quite useful when, for instance, the Bot you are going to assign to the campaign uses different field names from your Campaign file.
Group By
The “Group by” feature allows you to organize your contacts by grouping rows of data that share the same value within the selected field name. When you choose a field, the system generates groups based on the distinct values available in that field. You can then set an outbound schedule for each group you create. Learn more here.
Duplicate By
When creating a Campaign, the 'Duplicate by' feature lets you remove duplicate data and ensures you only start the conversations you want.
You can do this on any field, and we will only import the first instance of the value we get to but won't import any others.
Click NEXT.
Outbound schedule/s
Select Per Group if you have grouped your data on the previous screen and you want to create a different schedule for each group, select the 'Per group' option, then configure the schedule for each group. Select ' For All ' if you need the same schedule for all your contacts.
For Once-Off Campaigns
Select:
- Now - You will have to set the schedule end times, the Bot you are sending and the rate per minute. The schedule will start as soon as the setup process is completed.
- Future - You will have to set the start and end times, the Bot you are sending and the rate per minute. The schedule will start accordingly to what you have configured in here.
For Daily Campaign
Tick the days you want to send your Bots. Then set the start and end times, the Bot you are sending and the rate per minute.
The rate per minute is calculated from the start of the schedule window. If a file is dropped in after that time then it calculates how many messages should have been sent up to that point and sends those all at once, the campaign is trying to catch up. So if I have a file of 100 contacts and I have a schedule start time of 09:00 and an end time of 09:10, with a campaign rate of 10 per minute the following would happen: A file dropped in before 09:00 would schedule to start at 09:00, then send 10 messages at 9:00, 10 at 09:01 and so on. But if I dropped the file in at 09:05 it would send 60 messages at 09:05 (the 50 that should have gone between 9 - 9:04 and the 10 from 09:05).
Once that's all done click SCHEDULE then DONE.
Your Campaign has been created.
Once-Off Campaigns will be started according to the schedule/s you have configured, Daily Campaigns, instead need to be activated. (Check below how to activate a Daily Campaign.)
Please refer to the following documentation to learn more about Daily Campaign and Future Schedules.
Activate a Daily Campaign
To activate a Daily Campaign you will have to:
- Find your campaign through the search bar.
- Activate the campaign by uploading the file (Be sure to do this based on the import times you configured during the campaign setup process). If you release the file after the outbound schedules should have started and their end time has not yet expired, the campaign will try to catch up
Once this is done, your campaign will be up and running following the time you have set in the Outbound Schedule/s configuration.
Learn more here - Uploading Data To A Daily Campaign (webio.com)
Related Articles
Webio FAQ
General Why can't I log to my Webio account? If you can't log to your Webio Account, try first to clear your internet browser cache and cookies or to log in from incognito window or a different internet browser (Make sure you are entering your ...Self-Service Studio - Generate Campaign File
Overview The Generate Campaign screen l lets you segment your whole customers dataset and generate a customer targeted campaign file based on the range of values you specify in this panel's fields. Your campaign file will include: Customers' IDs ...How to create a Quick Campaign
Overview The Quick Campaign feature allows you to send a simple SMS to your contacts, without the need to create a bot first. This is very useful when you're in a hurry and don't need your contact to interact with an automated conversation. How to ...How to activate a Daily Campaign schedule - (Uploading data to a Daily Campaign)
Overview Once it is configured, the daily campaign will appear on the Webio Campaigns screen. Find it using the search bar then easily upload your contacts' data to activate it. Remember! Each time you create a daily campaign, you upload a template ...Self-Service Studio - Import Records
Overview Through the Import Records section you can: Upload new dataset or update existing one; download sample and template files; export your current whole customer records. Check file history uploads and also create an export file for each of the ...